Followers

Showing posts with label Petite Petals Punch. Show all posts

March 1, 2019

Yummy Yellow at Rainbow Card Challenge

Hi everyone,

Thanks for stopping by and for all your wonderful comments. I'm honored to have you here and I truly appreciate each of you more than you know!

It's the first of the month, so that means it's time for a new challenge at Rainbow Card Challenge.  Our theme this month is Yummy Yellow although your card does NOT have to be yummy, if you don't want to!  What we do ask is that it is MONOCHROMATIC YELLOW, but we don't mind a hint of another color if necessary.


And here's my card...

Card: SU's whisper white, daffodil delight, and so saffron
Ink: Antique linen Distress Ink
Stamp sets: SU's Timeless Textures
Tools and embellishments: Sue Wilson for Creative Expressions Petite Petal Mini Striplet, SU's Petite Petals punch, Nuvo sparkle shimmer pen, and unbranded rhinestones

Challenges...
AG at TTCRD
Wk 9 AG at Polkadoodles
#218 AG at 613 Avenue Create

I'll be back soon with another creation, so I hope you'll join me then.


July 18, 2018

Beverage Twofer

Hi everyone,

Thanks for stopping by and for all your wonderful comments.  I'm honored to have you here and I truly appreciate each of you more than you know!

The cards I'm sharing today were designed specifically for Darnell's Twofer Challenge.  With the exception of the punched flowers, both have been created from the same stamp and die bundle, as per the rules.  Here they are together...


And a closer look...


I chose the shorter cup because it is perfect to create flower pots.  Do you agree?

Card: SU's Whisper White and Cherry Cobbler
Ink: SU's Soft Suede, and Antique Linen (whip cream) and Worn Lipstick Distress Inks
Stamp sets: SU's Coffee Cafe
Tools and embellishments: SU's Coffee Thinlits and Petite Petal Punch, and rhinestones from my stash

Challenges...

#7 Beverage at Twofer Card Challenge
AG at TTCRD
July AG at Not Just Cards

I'll be back soon with another creation, so I hope you'll join me then.


May 25, 2018

Tower Card Pictorial

Hi everyone,

Thanks for stopping by and for all your wonderful comments. I'm honored to have you here and I truly appreciate each of you more than you know!

After posting my tower card earlier this week Kate asked how they are made.  So, while I tried to explain in a reply to her comment, it's much easier to see visibly.  By its nature the post is image heavy, so sit back and enjoy!

The card can be made in a number of sizes, but all mine fit into a 5" x 7" envelope.  So begin life as a 7" x 9" card, which is then scored on the long side at 1", 2", 3", 6", 7" and 8"...

Fold both the 2" and 7" lines back.  You can also fold all others forward at this point, but for ease of photography I left that until later...

Using a ruler and pencil, mark each side every 1/2".  You can use a stylus to do this, but using a pencil makes cutting with scissors easier...

Mark the cut lines to the center (3" and 6") scorelines...

Keeping the sides under, cut all lines through both layers of card to the center scores...

It was at this point which I burnished the other lines, and this is what it will look like opened up...

Erase the pencil lines and carefully push alternating cuts to the back.  It doesn't matter whether the bottom is in or out because it will stand both ways...

View from above to show the towers which give the style its name...

The card can now be decorated as desired.  Although I've not added a solid layer to the center, the offcut piece is perfect to use for this or another such card...

Card: SU's Thick Whisper White, Sweet Sugarplum and Blushing Bride
Tools and embellishments: Sue Wilson for CE Bora Bora from the Pacific Ocean collection, SU's long retired Petite Petal punch, and unbranded rhinestones

Challenges...
#200 AG at Artistic Inspirations
#166 AG at Crafty Gals Corner
#151 AG at Inspiration Destination

I'll be back soon with another creation, so I hope you'll join me then.


August 20, 2017

Flowers and/or Colors with HOC Team 3

Hi everyone,

Thanks for stopping by and for all your wonderful comments. I'm honored to have you here and I truly appreciate each of you more than you know!

House of Cards Design Team 3 are sharing our creations with you today for our current challenge. This month it's to include flowers and or colors with this inspiration...


And here's a reminder of my card...


Full details can be found on the original post here

I'll be back soon with another creation, so I hope you'll join me then.


August 1, 2017

Flowers and/or Colors at House of Cards

Hi everyone,

Thanks for stopping by and for all your wonderful comments. I'm honored to have you here and I truly appreciate each of you more than you know!

It's the 1st of the month and that means it's time for a new challenge at House of Cards.  This month we're asking you to use flowers, and or colors from the inspiration image...


I've used the colors and flowers for my card...


Card: SU's whisper white and rich razzleberry
Tools and embellishments: Sue Wilson's Noble Ornate Pierced Squares, SU's Petite Petals punch, and CE pearls

Challenges...
#261 AG at Brown Sugar
#184 AG at Artistic Inspirations
#170 AG at Crafting from the heart

I'll be back soon with another creation, so I hope you'll join me then.


July 26, 2017

Pacific Vellum Background

Hi everyone,

Thanks for stopping by and for all your wonderful comments. I'm honored to have you here and I truly appreciate each of you more than you know!

Taking my last Pacific Ocean Background card a step further, I've backed the frames with vellum and added flowers, pearls and a sentiment...


Card: SU's whisper and shimmery white, and vellum
Ink: Tattered Rose Distress Ink
Stamp sets: Memories are Made by Die'sire
Tools and embellishments: Sue Wilson's Pacific Ocean Background, SU's Petite Petals punch, and Creative Expressions pearls

Challenges...
#291-292 AG at Pixie's Snippets Playground
#133 AG at Crafty Gals Corner
#260 Layers at Brown Sugar

I'll be back soon with another creation, so I hope you'll join me then.


June 20, 2016

Teepee with Playful Backgrounds

Hi everyone,

Thanks for stopping by and for all your wonderful comments. I'm honored to have you here and I truly appreciate each of you more than you know!

Today I'm sharing the first Teepee card I created after seeing JanB's YouTube tutorial, so you could say it was my personal prototype before creating the one I created for the International Blog Hop earlier this month. I love 3D cards and I know this will be a favorite style...


While it looks stunning, it's easy to put together as you can see in the pictorial.

Card: Blushing Bride and Whisper White
Ink: Smoky Slate and Blushing Bride
Stamp sets: Playful Backgrounds, Petite Petals and Designer Tin of Cards
Tools and embellishments: Petite Petals punch, Mini Brads and Lots of Labels Framelits
Adhesives: Tombow and Stampin' Dimensionals

Challenges...
#234 AAG at Pixie's Snippets Playground
#181 AG at 613 Avenue Create
#33 June AG at Not Just Cards

I'll be back on Friday with another creation, so I hope you'll join me then.


April 4, 2016

Butterfly Triple Easel

Hi everyone,

Thanks for stopping by and for all your wonderful comments. I'm honored to have you here and I truly appreciate each of you more than you know!

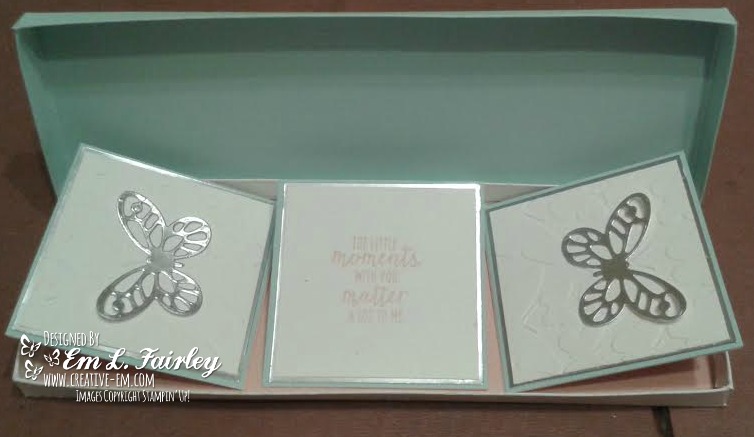
I had a GREAT time in Cornwall with Julia and will share some of the pix from the vacation with you soon. Here, as promised, is the second project I taught at her team training. A triple easel card that is MUCH easier to do than it looks...


Card: So Saffron, Whisper White and Silver Foil
Ink: Hello Honey
Stamp set: Watercolor Wings
Tools and Embellishments: Butterfly TIEF, Bold Butterflies Thinlits, Petite Petals punch and Mini Brads.
Adhesive: Tear & Tape, Stampin Dimensionals and Mini Glue Dots

Challenges...
#223 AAG at Pixie's Snippets Playground
#192 AG at Brown Sugar
#306 AAG at Craft Your Passion

Here's a couple of the versions that were made during the class...


I'll be back soon with another creation, so I hope you'll join me then.


January 18, 2016

Black, White & Elegant with Rose Wonder

Hi everyone,

Thanks for stopping by and for all your wonderful comments after my last post, where I explained my plans for this year. I'm honored to have you here and I truly appreciate each of you more than you know!

As I explained in that post, although I'm not creating as many cards as I have done previously, I am still getting some time to create. When I saw the latest challenge over at Can You Case It, Black, White and Elegant OR Fun, I knew that the new Rose Wonder bundle from Stampin' Up! would be perfect for an elegant card. AND it's their 3rd birthday, so I HAD to join in the celebration!

Although I've had a play with the dies from the bundle before, this was the first card I created with the bundle and I'm already hooked! I love it and hope you do too!


Card: Whisper White, Basic Black and Whisper White Glimmer Paper
Ink: Jet Black Memento
Stamp set: Rose Wonder
Tools and Embellishments: Rose Garden thinlits dies, Deco Labels framelits, Petite Petals punch, Crystal Effects and Itty Bitty Accents
Adhesive: Snail and Stampin' Dimensionals

Challenges...

#103 Black, White and Elegant at CYCI
#212 AAG at Pixie's Snippets Playground
#295 AAG at Craft Your passion

I'll be back on Friday with another creation. Yep, you get to see me twice this week, so I hope you'll join me then.


November 25, 2015

Thanksgiving Suite Part 2

Hi everyone,

Thanks for stopping by and for all your wonderful comments. I'm honored to have you here and I truly appreciate each of you more than you know!

The first of today's projects is a quick and easy banner created with my current favorite stamp set, Vintage Leaves from Stampin' Up!, the matching Framelits and Little Letters Framelits. I know it doesn't look much like a banner in the pic, but I assure you it's now hanging over my mantel, having had holes punched and silver cording trim threaded...

Today's second project, the favor boxes for my Thanksgiving table, have been created using a tutorial from the amazingly talented Pootles, aka my Stampin' Sister Sam Donald...


Card: Cajun Craze and Cherry Cobbler
Ink: Cajun Craze and Early Espresso
Stamp set: Vintage Leaves and For All Things
Tools and embellishments: Leaf and Little Letters Framelits, Petite Petals Punch (lid of box), 1/8" hole punch and silver cording trim
Adhesives: Tear & Tape, Stampin' Dimensionals and Tombow

Challenges...
#204 AAG at Pixie's Snippets Playground
#226 Be Thankful at HIMCR
#47 AG at Crafty Gals Corner

Whether or not you're celebrating the holiday, I want to take this opportunity to tell you how much I love and appreciate all of you, my readers and friends!

I'll be back on Friday with the rest of my Thanksgiving creations, so I hope you'll join me then.


August 28, 2015

Marble Effect Mini Cards

Hi everyone,

Thanks for stopping by and for all your wonderful comments. I'm honored to have you here and I truly appreciate each of you more than you know!

I've got a special treat for you today. I'm sharing not one, not two, but three mini cards! Well, if I can't spoil you, who can? ;) Each card has been created using a left over die cut panel from a project that I can't yet show you, but I promise THAT project will be worth the wait!


Card: Whisper White and a few snippets of Lost Lagoon for the last one
Ink: Tempting Turquoise, Soft Sky, Pool Party and Jet Black StazOn
Stamp set: Me = Grateful
Tools and embellishments: Deco Labels Framelits, Petite Petals Punch, Basic Rhinestones and Basic Pearls

Challenges...
#198 AAG at Word Art Wednesday
AAG at TTCRD
#276 AAG at Craft your passion
#48 AAG at Inspiration Destination
#191 AAG at Pixie's Snippets Playground

Whatever you're doing this weekend, have a GREAT one! I'll be back on Monday with another creation, so I hope you'll join me then.


July 20, 2015

Stampin' with Embossing Folders Pictorial

Hi everyone,

Thanks for stopping by and for all your wonderful comments. I'm honored to have you here and I truly appreciate each of you more than you know!

Following last week's series of cards that were all created by stampin' using the Boho Chic embossing folder from Stampin' Up! (which can be seen here, here and here), a few of you asked me how it was done, so today I'm sharing a bonus card, this time using two of my favorite inks and detailed pictorial on the basic technique. By it's nature this post is image heavy, so it might take some time to load...

Petite Petals and Butterfly Basics stamp sets, Boho Chic EF, Petite Petals and Decorative Label punches...

Tempting Turquoise and Rich Razzleberry inks, folded Whisper White card base, panel cut ¼" smaller and scraps for stamping...

Open the embossing folder and ink the raised image with Tempting Turquoise ink...

Carefully place the Whisper White card panel on top and press to transfer the ink...

Carefully lift up the panel and don't worry if there's some smudging...

Stamp chosen flower from Petite Petals 6 times in Rich Razzleberry ink...

Stamp sentiment from Butterfly Basics in the same ink...

Punch flowers and sentiment with the Petite Petals and Decorative Label punches...

Add Stampin' Dimensionals to the back of the panel, sentiment and flowers...

Attach panel to the folded Whisper White card base...

Attach flowers and sentiment and you're done...

Card: Whisper White
Ink: Tempting Turquoise and Rich Razzleberry
Stamp sets: Petite Petals and Butterfly Basics
Tools: Boho Chic TIEF, Petite Petals and Decorative Label punches
Adhesive: Stampin' Dimensionals

Challenges...
#186 AAG at Pixie's Snippets Playground
#192 AAG at Word Art Wednesday
July ~ Sharing at Path of Positivity (sharing how to create the design)

I'll be back on Wednesday with another creation, so I hope you'll join me then.

Hugs,
Em